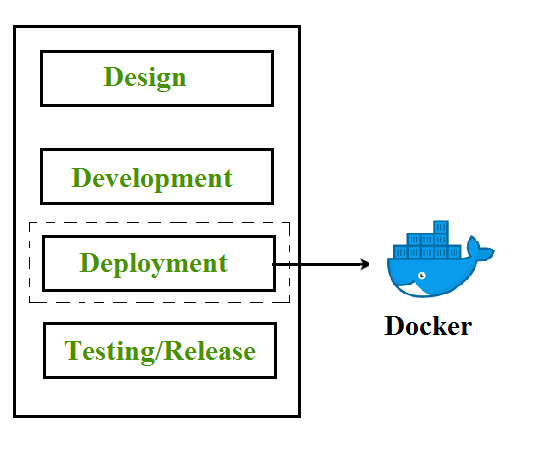
Docker is the containerization platform that is used to package your application and all its dependencies together in the form of containers to make sure that your application works seamlessly in any environment which can be developed or tested or in production. Docker is a tool designed to make it easier to create, deploy, and run applications by using containers.
Containerization is a form of OS-based virtualization.
- It creates multiple isolated virtual units called containers in the userspace.
- All containers share the same host operating system kernel.
- Isolation between containers is achieved using:
- Namespaces (process, network, filesystem isolation)
- Resource control mechanisms (CPU, memory limits)
Virtualization vs. Containerization
To understand Docker, you must understand what came before it: Virtual Machines (VMs).
- Virtual Machines (VMs): Virtualize the Hardware. Each VM runs a full Operating System (OS) on top of a Hypervisor. This is heavy; a VM can take up GBs of space and minutes to boot.
- Containers (Docker): Virtualize the Operating System. Containers share the host's OS kernel but keep applications isolated in "User Space." This is lightweight; containers take up MBs of space and boot in milliseconds.
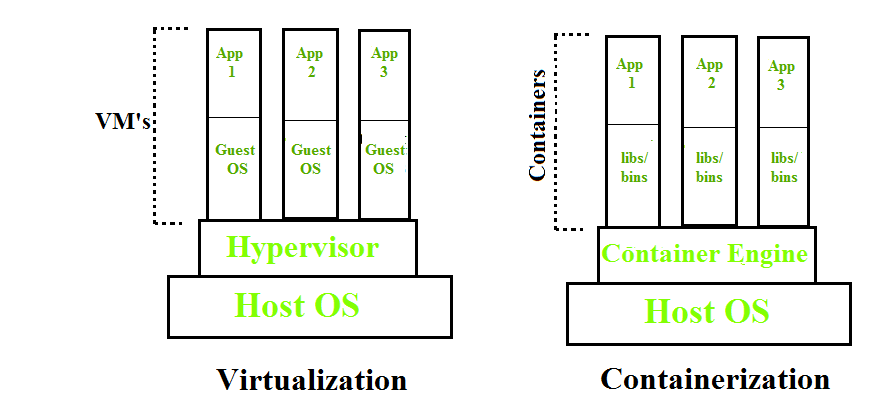
| Feature | Virtual Machines (VM) | Docker Containers |
|---|---|---|
| Isolation Level | Hardware (Heavy) | OS Level (Lightweight) |
| Boot Time | Minutes | Milliseconds |
| Size | Gigabytes (GB) | Megabytes (MB) |
| Portability | Low (Specific to Hypervisor) | High (Runs anywhere Docker is installed) |
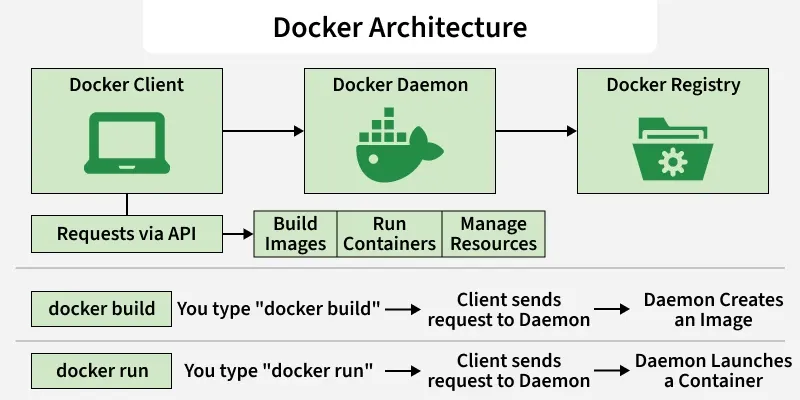
Docker Architecture
Docker uses a Client-Server architecture. It is not just a single program, but a system of three parts talking to each other.
- Docker Client: The command line tool (
docker) that you type commands into. - Docker Daemon (dockerd): The background process running on the host that does the heavy lifting (building, running, and distributing containers).
- Docker Registry: A storage location for Docker Images (like Docker Hub).
The Workflow:
- You type docker build -> Client sends request to Daemon -> Daemon creates an Image.
- You type docker run -> Client sends request to Daemon -> Daemon launches a Container.
Components of Docker
The main components of Docker include - Docker clients and servers, Docker images, Dockerfile, Docker Registries, and Docker containers. These components are explained in detail in the below section :
Docker Clients and Servers- Docker has a client-server architecture. The Docker Daemon/Server consists of all containers. The Docker Daemon/Server receives the request from the Docker client through CLI or REST APIs and thus processes the request accordingly. Docker client and Daemon can be present on the same host or different host.

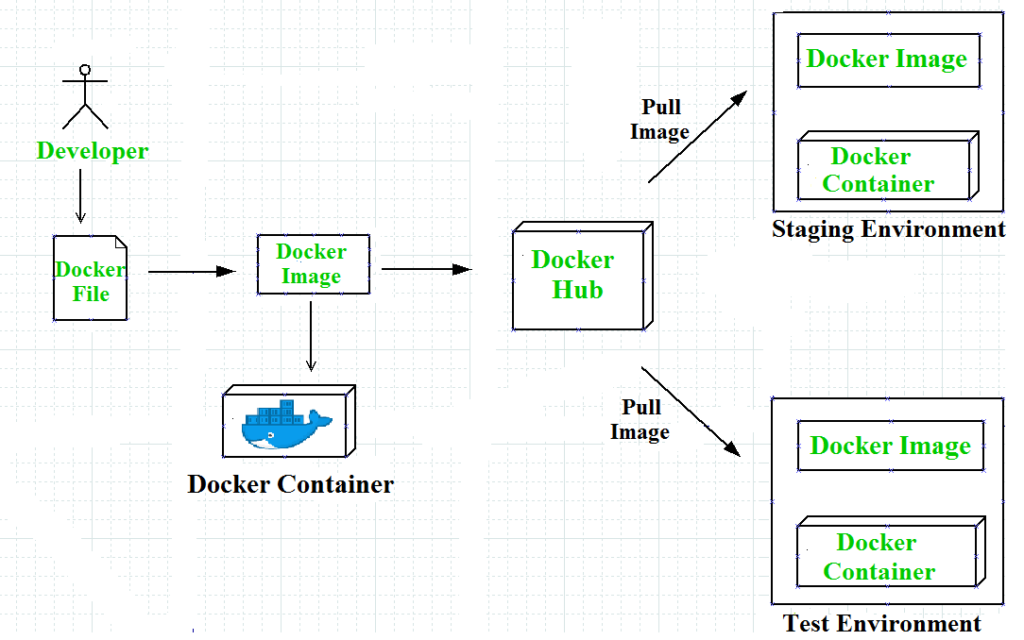
Docker Images- A Docker Image is a read-only, inert template that contains the application code, libraries, dependencies, tools, and other files needed for an application to run.
- Key Concept: Layered Architecture Images are not monolithic blobs; they are built in Layers.
- If you pull an image like nginx, you aren't downloading one big file. You are downloading multiple small layers (e.g., a layer for the OS, a layer for the Nginx software, a layer for config files).
- Immutability: Once an image is built, it cannot be changed. If you need to fix a bug, you don't "patch" the image; you modify the Dockerfile and build a new image
Docker File -A Dockerfile is a plain text file containing a sequential list of instructions (commands) that the Docker Daemon reads to automatically build an image. It is the "source code" of your infrastructure. Every line in a Dockerfile creates a new "layer" in the image. Docker reads the file from top to bottom.
- FROM: The starting point (e.g., FROM ubuntu:20.04). This is the foundation.
- RUN: Executes commands during the build process (e.g., RUN apt-get install python3). This "bakes" software into the image.
- COPY: Moves your actual code from your computer into the image.
- CMD: The default command that runs when the container starts (e.g., CMD ["python", "app.py"]).
Docker Containers- A Container is a runnable instance of an image. It is the actual "living" process. When you start a container, Docker takes the read-only Image and adds a thin Read-Write (R/W) layer on top of it.
Key Concept: The R/W Layer
- Because the Image is read-only, the Container needs a place to write data (logs, temp files, database entries).
- Any changes made inside a running container (like creating a file) happen in this temporary top layer. If you delete the container, this layer is destroyed, but the underlying Image remains untouched.
Docker Compose
Docker Compose is a tool with which we can create a multi-container application. It makes it easier to configure and run applications made up of multiple containers.
- Makes it easier to configure and run applications with multiple containers.
- An application needing WordPress and MySQL can be started together using one file.
- YAML file definition: Multi-container applications are defined in a docker-compose.yml file.
- Foreground execution: Running docker-compose up starts the application in the foreground.
- Default file lookup: Docker Compose looks for docker-compose.yml in the current folder.
- Background execution: Adding the -d option (docker-compose up -d) starts the application in detached mode (background).
Creating a docker-compose. YAML file for WordPress application :
#cat docker-compose.yaml
version: ’2’
services:
db:
image: mysql:5.7
volumes:db_data:/var/lib/mysql
restart: always
environment:
MYSQL_ROOT_PASSWORD: WordPress
MYSQL_DATABASE: WordPress
MYSQL_USER: WordPress
MYSQL_PASSWORD: WordPress
WordPress:
depends_on:
- DB
image: WordPress:latest
ports:
- "8000:80"
restart: always
environment:
WORDPRESS_DB_HOST: db:3306

WORDPRESS_DB_PASSWORD: wordpress
volumes:
db_data:
In this docker-compose. YAML file, we have the following ports section for the WordPress container, which means that we are going to map the host’s 8000 port with the container’s 80 port. So that host can access the application with its IP and port no.
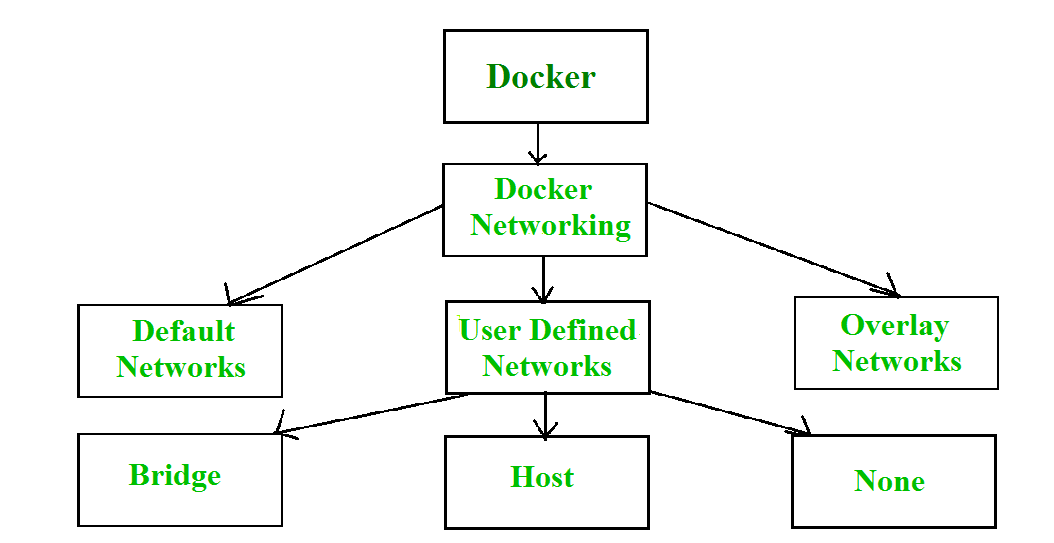
Docker Networks
When we create and run a container, Docker by itself assigns an IP address to it, by default. Most of the time, it is required to create and deploy Docker networks as per our needs. So, Docker let us design the network as per our requirements. There are three types of Docker networks- default networks, user-defined networks, and overlay networks.
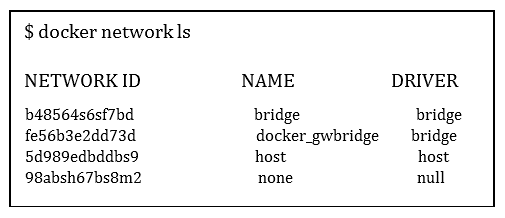
To get a list of all the default networks that Docker creates, we run the command shown below -
There are FOUR types of networks in Docker -
- Bridged network: When a new Docker container is created without the –network argument, Docker by default connects the container with the bridge network. In bridged networks, all the containers in a single host can connect through their IP addresses. A Bridge network is created when the span of Docker hosts is one i.e. when all containers run on a single host. We need an overlay network to create a network that has a span of more than one Docker host.
- Host network: When a new Docker container is created with the –network=host argument it pushes the container into the host network stack where the Docker daemon is running. All interfaces of the host are accessible from the container which is assigned to the host network. UseCase: High-performance networking.
- None network: When a new Docker container is created with the –network=none argument it puts the Docker container in its network stack. So, in this none network, no IP addresses are assigned to the container, because of which they cannot communicate with each other. UseCase: High-security, offline batch jobs.
- Overlay: Used for multi-host networking (Swarm/Kubernetes).
We can assign any one of the networks to the Docker containers. The --network option of the 'docker run' command is used to assign a specific network to the container.
$docker run --network ="network name"To get detailed information about a particular network we use the command-
$docker network inspect "network name"Advantages of Docker -
Docker has become popular nowadays because of the benefits provided by Docker containers. The main advantages of Docker are:
- Speed - The speed of Docker containers compared to a virtual machine is very fast. The time required to build a container is very fast because they are tiny and lightweight. Development, testing, and deployment can be done faster as containers are small. Containers can be pushed for testing once they have been built and then from there on to the production environment.
- Portability - The applications that are built inside docker containers are extremely portable. These portable applications can easily be moved anywhere as a single element and their performance also remains the same.
- Scalability - Docker has the ability that it can be deployed on several physical servers, data servers, and cloud platforms. It can also be run on every Linux machine. Containers can easily be moved from a cloud environment to a local host and from there back to the cloud again at a fast pace.
- Density - Docker uses the resources that are available more efficiently because it does not use a hypervisor. This is the reason that more containers can be run on a single host as compared to virtual machines. Docker Containers have higher performance because of their high density and no overhead wastage of resources.
Essential Docker Commands
Here are the commands you will use most of the time:
| Command | Description |
|---|---|
| docker build -t app:v1 . | Build an image from a Dockerfile in the current directory. |
| docker pull nginx | Download an image from Docker Hub. |
| docker run -d -p 80:80 nginx | Run a container in the background (-d) mapping port 80. |
| docker ps | List currently running containers. |
| docker images | List all downloaded/built images. |
| docker stop [ID] | Gracefully stop a container. |
| docker rm [ID] | Delete a stopped container. |
| docker rmi [Image] | Delete an image. |
| docker logs [ID] | View the output/logs of a container. |
| docker exec -it [ID] bash | Enter a running container's shell. |