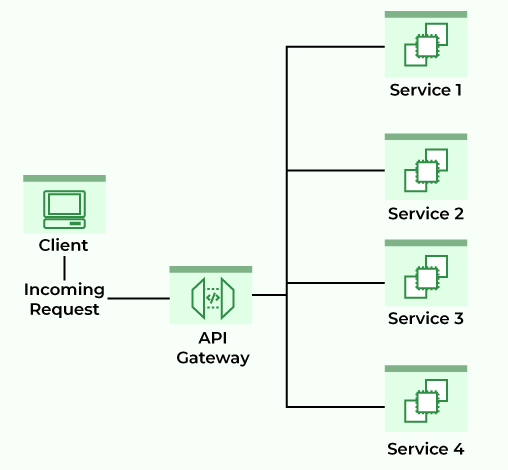
In microservices architecture, an API Gateway acts as the single entry point for client applications to interact with multiple microservices. It manages requests, routes them to the appropriate services, and can handle cross-cutting concerns like authentication, logging, and rate limiting. A well-known example of an API Gateway is Netflix’s Zuul.
Spring Cloud Gateway provides a simple, flexible way to implement API gateways in Spring Boot applications.
Why Implement API Gateway in Microservices
- Provides a single entry point for all client requests.
- Simplifies communication between clients and microservices.
- Allows central handling of concerns such as security, logging, and throttling.
- Eliminates the need for clients to track individual microservice ports.
What is Spring Cloud Gateway?
Spring Cloud Gateway is a library built on Spring Framework 5, Project Reactor, and Spring Boot 2.x. It provides:
- Flexible routing based on request attributes.
- Filters and predicates specific to routes.
- Integration with Circuit Breakers and DiscoveryClient.
- Support for path rewriting and other cross-cutting concerns.
Note: Please refer to this article to know more about Spring Cloud Gateway.
Include Spring Cloud Gateway:
For Maven:
<dependency>
<groupId>org.springframework.cloud</groupId>
<artifactId>spring-cloud-starter-gateway</artifactId>
</dependency>
For Gradle:
implementation("org.springframework.cloud:spring-cloud-starter-gateway")
To disable the gateway, if needed:
spring.cloud.gateway.enabled=false
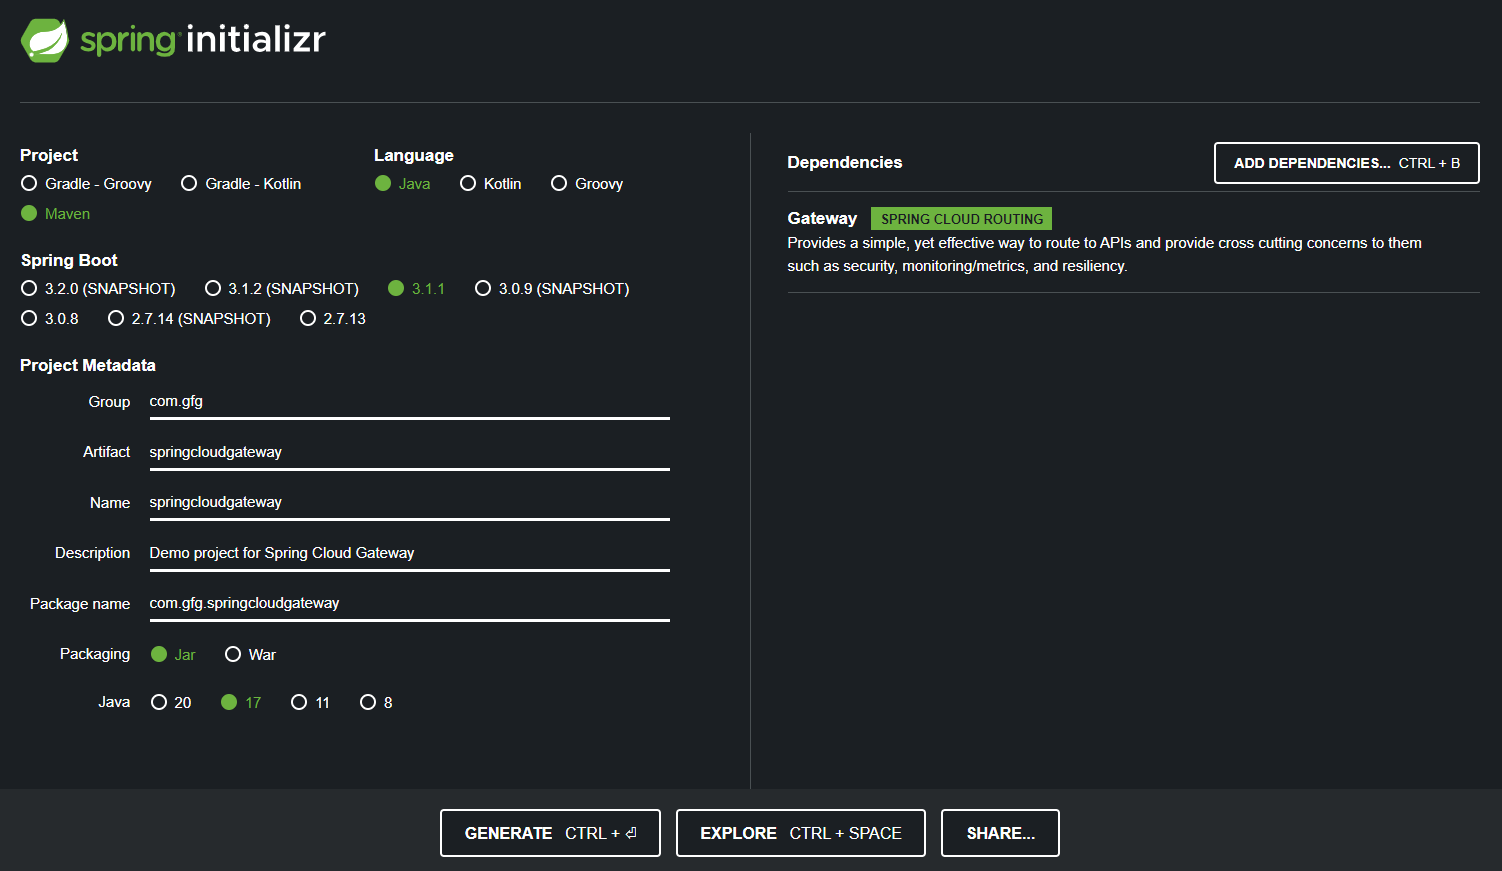
Step 1: Create a Spring Boot Project
- Project: Maven
- Language: Java
- Packaging: Jar
- Java Version: 17
- Dependency: Spring Cloud Gateway
pom.xml Example:
<dependencies>
    <dependency>
        <groupId>org.springframework.cloud</groupId>
        <artifactId>spring-cloud-starter-gateway</artifactId>
    </dependency>
    <dependency>
        <groupId>org.springframework.boot</groupId>
        <artifactId>spring-boot-starter-test</artifactId>
        <scope>test</scope>
    </dependency>
</dependencies>

<dependencyManagement>
    <dependencies>
        <dependency>
            <groupId>org.springframework.cloud</groupId>
            <artifactId>spring-cloud-dependencies</artifactId>
            <version>${spring-cloud.version}</version>
            <type>pom</type>
            <scope>import</scope>
        </dependency>
    </dependencies>
</dependencyManagement>
Step 2: Configure application.yaml for Routing
server:
port: 8085
spring:
application:
name: API-GATEWAY-SERVICE
cloud:
gateway:
routes:
- id: DEMO-SERVICE
uri: http://localhost:9090
predicates:
- Path=/demo/**
- id: Unique identifier for the route.
- uri: Microservice base URL.
- predicates (Path): Any request starting with /demo/** is routed to the DEMO-SERVICE.
Step 3: Create the Microservice (DEMO-SERVICE)
Create a Spring Boot microservice with Spring Web dependency.
DemoController.java
package com.gfg.demo.controller;

import org.springframework.http.ResponseEntity;
import org.springframework.web.bind.annotation.GetMapping;
import org.springframework.web.bind.annotation.RequestMapping;
import org.springframework.web.bind.annotation.RestController;

@RestController
@RequestMapping("/demo")
public class DemoController {

    @GetMapping("/gfg")
    public ResponseEntity<String> getMessage() {
        return ResponseEntity.ok("Welcome to GeeksforGeeks");
    }
}
To run the microservice at port 9090.
application.properties:
server.port=9090
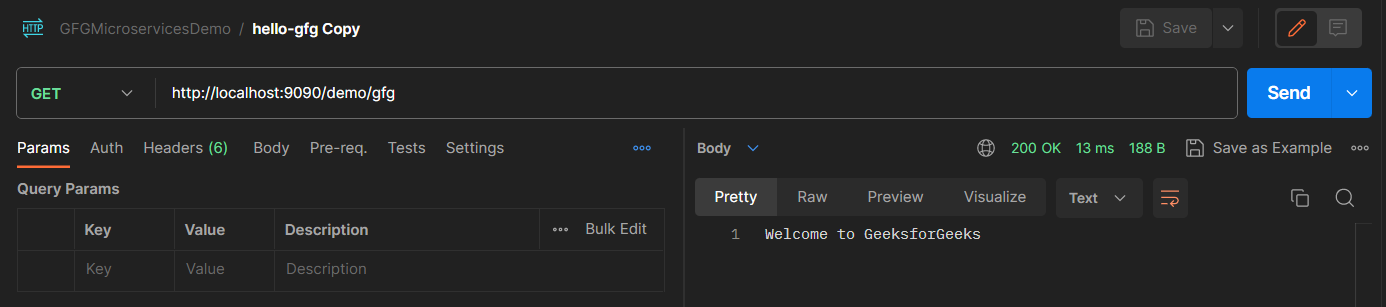
Step 4: Test the API Gateway
Access the microservice directly:
http://localhost:9090/demo/gfg
And you are going to get a response like this
Now, you can access the microservice via the API Gateway too:
http://localhost:8085/demo/gfg
And you are going to get a response like this
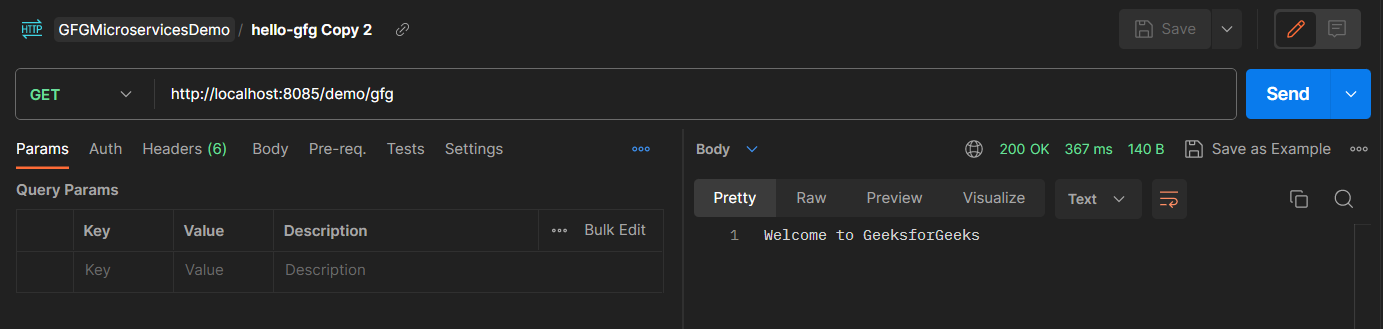
Both URLs return the same response. The API Gateway routes requests without requiring the client to know microservice ports.