Creating a REST API using Spring Boot allows developers to build scalable and production-ready web services with minimal configuration. It simplifies RESTful service development by providing built-in support for HTTP methods, dependency injection, and auto-configuration.
- Offers embedded servers (Tomcat/Jetty) to run applications without external deployment
- Supports API testing using tools like Postman or Swagger UI
- Allows easy configuration via application.properties or application.yml
Why Spring Boot?
Spring Boot makes it easy to create production-ready apps:
- Built on top of Spring Framework
- Reduces boilerplate code with auto-configurations
- Quick setup for REST APIs
- Beginner-friendly
Steps to Implements a REST API in Spring Boot
Follow the below steps to create and run a REST API in Spring Boot.
Step 1: Create the Spring Boot Project
Using Spring Initializr (Recommended)
1. Open Spring Initializr in your browser.
2. Fill in the project details:
- Project: Maven
- Language: Java
- Spring Boot version: (latest stable, e.g., 3.1.x)
- Group: com. example
- Artifact: demo
- Name: demo
- Packaging: Jar
- Java version: 17+
3. Click Add Dependencies-> Select Spring Web.
4. Click Generate-> It will download a .zip file.
5. Extract the zip-> Open it in your IDE (IntelliJ / Eclipse / VS Code).

Step 2: Define the Employee Entity
Create a simple Employee class inside com.example.demo:
package com.example.demo;

// Employee entity class
public class Employee {

    private Integer id;
    private String firstName;
    private String lastName;
    private String email;

    // Default constructor
    public Employee() {}

    // Parameterized constructor
    public Employee(Integer id, String firstName, String lastName, String email) {
        this.id = id;
        this.firstName = firstName;
        this.lastName = lastName;
        this.email = email;
    }

    // Getters and Setters
    public Integer getId() {
        return id;
    }

    public void setId(Integer id) {
        this.id = id;
    }

    public String getFirstName() {
        return firstName;
    }

    public void setFirstName(String firstName) {
        this.firstName = firstName;
    }

    public String getLastName() {
        return lastName;
    }

    public void setLastName(String lastName) {
        this.lastName = lastName;
    }

    public String getEmail() {
        return email;
    }

    public void setEmail(String email) {
        this.email = email;
    }

    @Override
    public String toString() {
        return "Employee [id=" + id + ", firstName=" + firstName +
                ", lastName=" + lastName + ", email=" + email + "]";
    }
}
Step 3: Create a Storage Class
Create a class to hold a list of employees.
package com.example.demo;

import java.util.ArrayList;
import java.util.List;

// Storage class for employees
public class Employees {

    private List<Employee> employeeList;

    // Get the employee list (initialize if null)
    public List<Employee> getEmployeeList() {
        if (employeeList == null) {
            employeeList = new ArrayList<>();
        }
        return employeeList;
    }

    public void setEmployeeList(List<Employee> employeeList) {
        this.employeeList = employeeList;
    }
}
Step 4: Create the DAO Class
The DAO class will handle adding and retrieving employees.
package com.example.demo;

import org.springframework.stereotype.Repository;

@Repository
public class EmployeeDAO {

    private static Employees employees = new Employees();

    static {
        // Initialize with sample employees
        employees.getEmployeeList()
          .add(new Employee(1, "Prem", "Tiwari", "prem@gmail.com"));
        employees.getEmployeeList()
          .add(new Employee(2, "Vikash", "Kumar", "vikash@gmail.com"));
        employees.getEmployeeList()
          .add(new Employee(3, "Ritesh", "Ojha", "ritesh@gmail.com"));
    }

    // Retrieve all employees
    public Employees getAllEmployees() {
        return employees;
    }

    // Add an employee
    public void addEmployee(Employee employee) {
        employees.getEmployeeList().add(employee);
    }
}
Step 5: Create the Controller
The controller contains the REST API endpoints.
package com.example.demo;

import org.springframework.beans.factory.annotation.Autowired;
import org.springframework.http.ResponseEntity;
import org.springframework.web.bind.annotation.*;
import org.springframework.web.servlet.support.ServletUriComponentsBuilder;

import java.net.URI;

// REST Controller for managing employees
@RestController
@RequestMapping("/employees")
public class EmployeeController {

    @Autowired
    private EmployeeDAO employeeDao;

    // GET endpoint to fetch all employees
    @GetMapping("/")
    public Employees getEmployees() {
        return employeeDao.getAllEmployees();
    }

    // POST endpoint to add a new employee
    @PostMapping("/")
    public ResponseEntity<Object>
      addEmployee(@RequestBody Employee employee) {

        // Generate ID for the new employee
        Integer id = employeeDao.getAllEmployees()
          .getEmployeeList().size() + 1;
        employee.setId(id);

        // Add employee to the list
        employeeDao.addEmployee(employee);

        // Build location URI for the new employee
        URI location = ServletUriComponentsBuilder
          .fromCurrentRequest()
                .path("/{id}")
                .buildAndExpand(employee.getId())
                .toUri();

        return ResponseEntity.created(location).build();
    }
}
Step 6: Run the Application
Open DemoApplication.java (already generated by Spring Boot) and run it:
package com.example.demo;

import org.springframework.boot.SpringApplication;
import org.springframework.boot.autoconfigure.SpringBootApplication;

@SpringBootApplication
public class DemoApplication {
    public static void main(String[] args) {
        SpringApplication.run(DemoApplication.class, args);
    }
}
Step 7: Testing the API
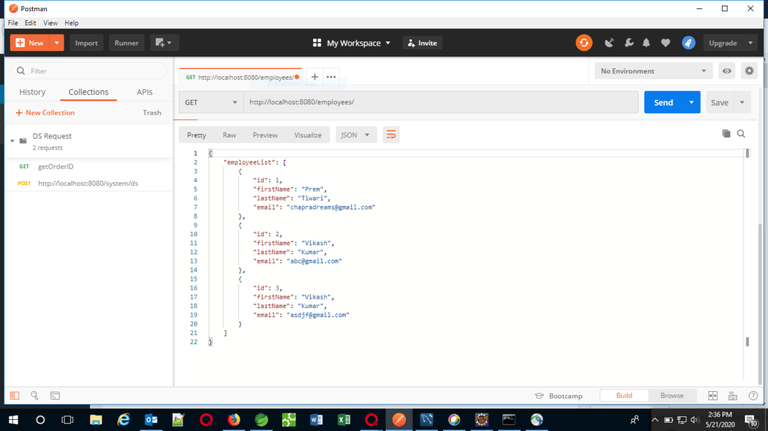
Now we can test the API using tools like Postman or a web browser.
GET Request: Fetch all employees
URL: http://localhost:8080/employees/
Response:
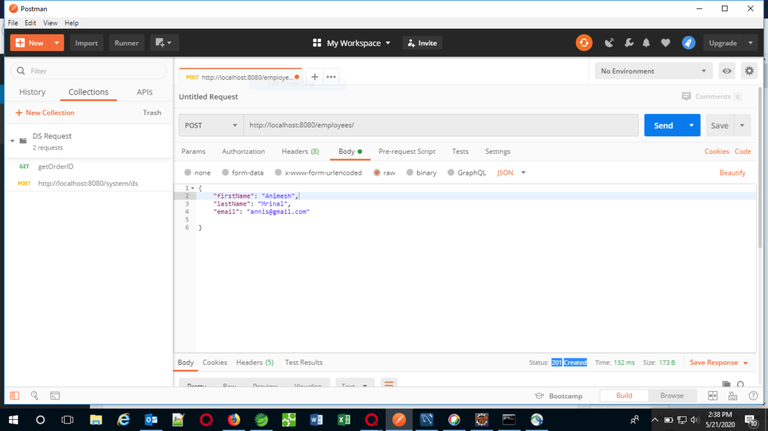
POST Request: Add a new employee
Response:
Again hitting the GET request after performing the POST request:

This concludes creating a REST API using Spring Boot. Now we have a fully functioning API to manage employees.