JavaServer Pages (JSP) is a server-side technology that creates dynamic web applications. It allows developers to embed Java code directly into HTML pages and it makes web development more efficient. JSP is an advanced version of Servlets. It provides enhanced capabilities for building scalable and platform-independent web pages.
- It is platform-independent; we can write once, run anywhere.
- It simplifies database interactions for dynamic content.
- It contains predefined objects like request, response, session and application, reducing development time.
- It has built-in mechanisms for exception and error management.
- It supports custom tags and tag libraries.
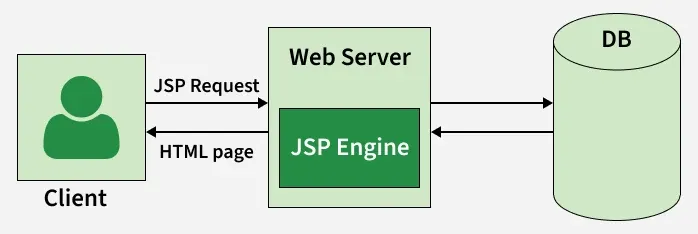
JSP Architecture
JSP follows a three-layer architecture:
- Client Layer: The browser sends a request to the server.
- Web Server Layer: The server processes the request using a JSP engine.
- Database/Backend Layer: Interacts with the database and returns the response to the client.
JSP Elements
We will learn several elements available in JSP with suitable examples. In JSP elements can be divided into 4 different types.
1. Expression
Expression tag is used to output any data on the generated page. These data are automatically converted to a string and printed on the output stream.
Syntax:
<%= "Anything" %>
Note: JSP Expressions start with Syntax of JSP Scriptles are with <%=and ends with %>. Between these, you can put anything that will convert to the String and that will be displayed.
Example:
<%="HelloWorld!" %>
2. Scriplets
ScripletsTag is used to write Java code inside JSP. The code is placed inside the _jspService() method.
Syntax:
<%
// Java codes
%>
Note: JSP Scriptlets begins with <% and ends %> . We can embed any amount of Java code in the JSP Scriptlets. JSP Engine places these codes in the _jspService() method.
Example:
<%
String name = "Geek";
out.println("Hello, " + name);
%>
Variables available to the JSP Scriptlets are:
- Request
- Response
- Session
- Out
3. Directives
A JSP directive starts with <%@ characters. In the directives, we can import packages, define error-handling pages or configure session information for the JSP page.
Syntax:
<%@ directive attribute="value" %>
Types of Directives:
- page: It defines page settings.
- include: It includes other files.
- taglib: It declares a custom tag library.
4. Declarations
Declarations is used for defining functions and variables to be used in the JSP.
Syntax:
<%!
//java codes
%>
Note: JSP Declaratives begins with <%! and ends %> with We can embed any amount of java code in the JSP Declaratives. Variables and functions defined in the declaratives are class-level and can be used anywhere on the JSP page.
Example:
<%@ page import="java.util.*" %>
<html>
<body>
    <%!
        Date theDate = new Date();
        Date getDate() {
            System.out.println("In getDate() method");
            return theDate;
        }
    %>
    Hello! The time is now <%= getDate() %>
</body>
</html>
Example of a JSP Web Page
<!DOCTYPE html>
<html>
<head>
    <title>A Web Page</title>
</head>
<body>
    <% out.println("Hello there!"); %>
</body>
</html>
Steps to Create a JSP Application
JSP (JavaServer Pages) is a technology used to create dynamic web applications by embedding Java code directly into HTML pages. Follow these simple steps to create your first JSP application.
Prerequisite:
- Install Java JDK (8 or above)
- Install Eclipse IDE (or any IDE with web support)
- Download and configure Apache Tomcat server in Eclipse
note: make sure set up Dynamic Web Project in Eclipse
Step 1: Create a Dynamic Web Project
- Open Eclipse -> File ->New ->Dynamic Web Project
- Enter project name (e.g., JSPDemo)
- Select Target Runtime (Apache Tomcat)
- Finish setup and Eclipse will generate basic project structure
Step 2: Create a JSP File
- Right-click on WebContent or webapp folder -> New ->JSP File
- Name your file (e.g., hello.jsp)
- Add HTML and Java code (example below):
Here is an example to demonstrate how JSP can generate dynamic content:
hello.jsp:
<!DOCTYPE html>
<html>
<body>
    Hello! The time is now <%= new java.util.Date() %>
</body>
</html>
Explanation:
- The <%= %> tags enclose a Java expression.
- new java.util.Date() expression retrieves the current date and time.
- When the JSP page is loaded in the browser, the Java expression is evaluated at runtime and output is embedded into the HTML.
Step 3: Running a Simple JSP Page
Steps to Run JSP
- Save JSP file using the .jsp extension (e.g., hello.jsp).
- Start server (e.g., Apache Tomcat).
- Place your application inside the appropriate folder (e.g., webapps for Tomcat).
- Open the browser and enter the JSP page URL:
http://localhost:8080/JSPDemo/hello.jsp
The JSP file is compiled and executed.
Differences Between JSP and Servlets
Features | JSP | Servlet |
|---|---|---|
Code Length | Jsp required less code | Servlets required more code |
Ease of Use | Jsp is simple to use | Servlet is more complex to use |
Dynamic Content | Easily embedded in HTML | Requires HTML generation in code |
Page Maintenance | Easier to maintain | More challenging |