Visual Testing, also known as Visual UI Testing, ensures that an application’s user interface appears correct and consistent across different devices and browsers. It checks layout, colors, fonts, and alignment to match the expected design, focusing on how the application looks rather than how it functions.
- Detects unintended visual changes by comparing UI elements with baseline designs.
- Ensures consistent user experience across devices, browsers, and operating systems.
Applications of Visual Testing
- UI Validation: Ensures buttons, text, images, and other elements appear correctly and in the right position.
- Layout Consistency: Maintains proper alignment across devices and screen sizes.
- Theme & Colors: Confirms correct color scheme and design standards.
- Text & Fonts: Checks font style, size, and readability.
Visual Inspection System
Uses image-capturing software to automatically inspect product quality.
- Compares captured images with predefined standards or requirements.
- Reduces manual effort and human errors.
- Improves speed, accuracy, and consistency in quality control.
Working of Visual Testing
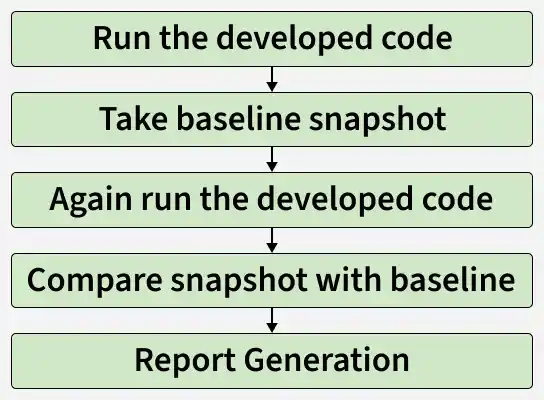
Visual testing works by capturing browser screenshots (snapshots) and comparing them with baseline images to detect visual differences (pixel changes).
Steps in Visual Testing:
- The tester runs the application and captures baseline screenshots of the correct UI.
- New screenshots are taken after code changes or updates.
- The tool compares current screenshots with baseline images.
- If differences are detected, the test fails; if not, it passes.
- Reports highlight the exact areas where visual changes occur.
- Developers either fix unintended issues or update the baseline if changes are intentional.
Importance of Visual Testing
Visual testing is essential because visual errors can occur frequently and impact user experience. Key benefits include:
- Ensures the UI appears as expected to users.
- Detects defects and unintended changes in the interface.
- Identifies variations not covered by baseline snapshots.
- Helps create focused visual test cases alongside functional testing.
- Makes it easier for testers to evaluate UI visually.
Role of Visual Testing in UI Quality
Functional testing ensures features work correctly but cannot catch visual issues like misaligned buttons, broken layouts, or inconsistent fonts, which affect user experience.
Example: If a submit button is accidentally moved from the center to the side, functional testing will still pass since the button works. Visual testing, by comparing current UI snapshots with baseline images, detects such layout defects quickly, helping testers identify issues with fewer test runs.
Visual Testing Methods
Below are some of the methods for Visual testing:
- Dedicated Visual Tests: Write separate test cases for different UI scenarios. Requires more effort but ensures accurate and thorough validation.
- Add Visual Checks to Functional Tests: Integrate visual checks into existing functional tests. Quick to implement but covers fewer visual scenarios.
- Implicit Visual Validation: Add a few lines of code to automatically check UI elements within the existing testing framework. Easy to implement but limited to generic validations.
Types of Visual Testing
Below are the two types of visual testing:
1. Manual Visual Testing:
- Testers manually check UI elements and layouts by taking screenshots and comparing them with baseline images.
- Tools like React Storybook allow testing UI components in isolation.
- Steps:
- Capture baseline screenshots of the app.
- Take new screenshots after updates.
- Compare baseline vs. current images to detect visual bugs.
2. Automated Visual Testing:
- Uses tools to automatically verify if the UI appears as intended.
- Faster, more accurate, reusable, and reduces human error.
- Cloud platforms like LambdaTest allow testing across multiple devices and browsers at scale.
- Ideal for regression testing and frequent UI updates.
- Automated screenshot comparison detects subtle differences that are hard to notice manually and supports complex end-to-end testing.
Tools for automated visual testing
Some of the popular code-based open-source tools for automated visual testing:
1. Specter
- Automated visual regression testing framework.
- Captures screenshots of individual components across different screen sizes to verify proper rendering.
2. Needle
- Compares screenshots of website elements like images, layouts, buttons, CSS, and SVG against known good screenshots.
- Can also test CSS values and HTML element positions.
3. Gemini
- Checks the visual appearance of web pages separately.
- Tests CSS properties and element positioning, while gathering CSS statistics.
- Some advanced image rendering features may not be supported.
4. Pix-Diff
- Compares screenshots using Pixel-by-Pixel, Perceptual, and Context methods.
- Detects missing parts or low-frequency image issues effectively.
5. FBSnapshotTestcases
- Captures UI Views or layers using the UI kit.
- Generates reference images and compares them with actual screenshots.
- Even a single pixel difference can mark the test as failed, ensuring high precision.
Configuration - Based automated visual testing (Open Source Tools)
These tools focus on configuration and layout verification rather than coding:
- CSS Visual Test: Verifies CSS properties match the design.
- VIFF: Detects differences across environments (dev, staging, production).
- GreenOnion: Validates only UI parts of websites.
- Galen Framework: Tests layouts across devices and screen sizes.
- CSSCritic: Continuously compares current layouts with reference images.
- BackstopJS: Compares full or partial UI layouts with DOM screenshots.
Additional types of Visual Testing
- Visual Regression: Detects unintended UI changes by comparing with baseline images.
- Cross-Browser: Ensures consistent appearance across browsers.
- Responsive Design: Verifies UI adapts to different screen sizes.
- Accessibility: Checks UI meets accessibility standards for all users.
- Localization & Internationalization: Confirms proper display across languages and regions.
Advantages of Visual Testing
- Improves overall UI and code quality.
- Detects visual bugs quickly and efficiently.
- Ensures consistent UI across devices and browsers.
- Easy and fast to implement.
- Supports automation for repeatable tests.
- Reduces manual testing effort and code duplication.
- Provides clear feedback during testing.
Disadvantages of Visual Testing
- May miss very small or subtle defects.
- Requires some technical skill, which can be challenging for beginners.
- Video or screenshot recordings may not always be clear.
- Some issues may remain undetected.
- Focuses only on visible elements, not underlying functionality.